In 2015, Ford introduced its all-aluminum F-150 body. In 2023, Ford sold about 765,000 F150s, which translates to roughly 7 million aluminum trucks on the road today. There is a great opportunity to repair these trucks, yet many shops shy away from anything more than fender replacements because of the aluminum.
It boils down to proper tools and training.
The aluminum cab corner of a Ford F-250 is damaged. The panel is about 1.5 mm thick.
Everyone I asked, “How would you repair this?” answered they would replace it. When I asked if they had the tools, equipment and training to replace it, the majority said they would not accept the job.
Check out the results using advanced tools and training furnished by KECO Body Repair Products.
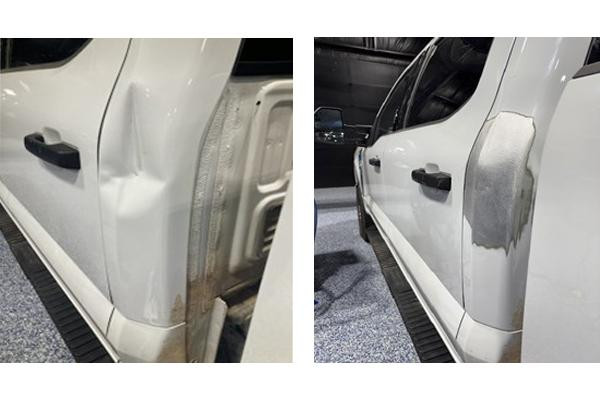 The F-250 cab, before and after repair.
Besides using self-piercing rivets (SPRs), Ford uses blind structural rivets. While teaching the I-CAR Rivet Bonding class, I have seen most techs do not understand why blind rivets are used, or the proper removal and installation procedures. This is what this article will accomplish.
With stronger and lighter materials being used in today’s vehicles, we are seeing a combination of several different types of steel, together with aluminum, magnesium, plastics and carbon fiber.
Not everything can be welded, so we are seeing new and different joining methods. Remember, heat will weaken high strength steels and destroy ultra-high strength steels.
For example, Honda began using ultra high strength steel in “A” pillar, “B” pillar and rocker reinforcements on its 2013 Accord. Honda stated in the repair statement: “Parts made of Ultra-High-Strength Steel (UHSS/1,500MPa/USIBOR) must be installed as a complete part. No sectioning allowed. Ultra-High Strength Steel requires special welding equipment, procedures and settings. See the welding section of the appropriate body repair manual. Failure to use the proper equipment or follow the proper procedures can result in an unsafe repair.” It goes on: “Never do MAG-MIG welding on 1,500 MPa steel.”
The repair industry is being asked by OEMs to invest in new equipment and training to repair their vehicles properly. I could go on about this trend, but let’s get back to adhesive rivet bonding, or as some call it, cold bonding.
Welding will be used less. The alternative is adhesive, which has excellent tensile strength and is extremely strong when conducting a peel test, but is weak when conducting a shear test. To overcome this deficiency, rivets, spot welding or some form of mechanical fasteners are needed to prevent shearing.
 Rivets.
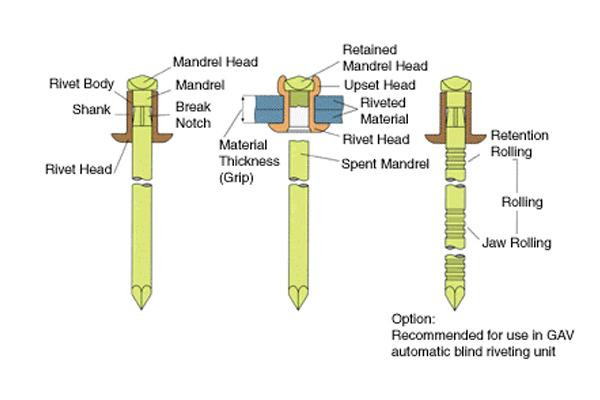
The most important items the figure to the left are the material type and thickness and the shank size. The vehicle engineers will determine everything needed for the repair operation, but you need to know the proper shank size to drill or punch the hole in the material. If the hole is the wrong size, the rivet could be loose and shear movement could occur. Too small a hole could cause the metal to distort and again, the panels will not be in full contact with each other.
There are four major types of rivets used in the repair process: SPRs, flow form, solid and blind. We will look at Hemlock, Monobolt and Pop rivets in the blind rivet category.
Look at the front side of the panels (below top). The rivet heads look very similar. The panel on the left is a Hemlock rivet and the rivet gun (battery or pneumatic) needs 3,500 pounds of pulling pressure. The panel on the right is a Pop rivet from Home Depot and is hand-set with a Pop rivet tool.
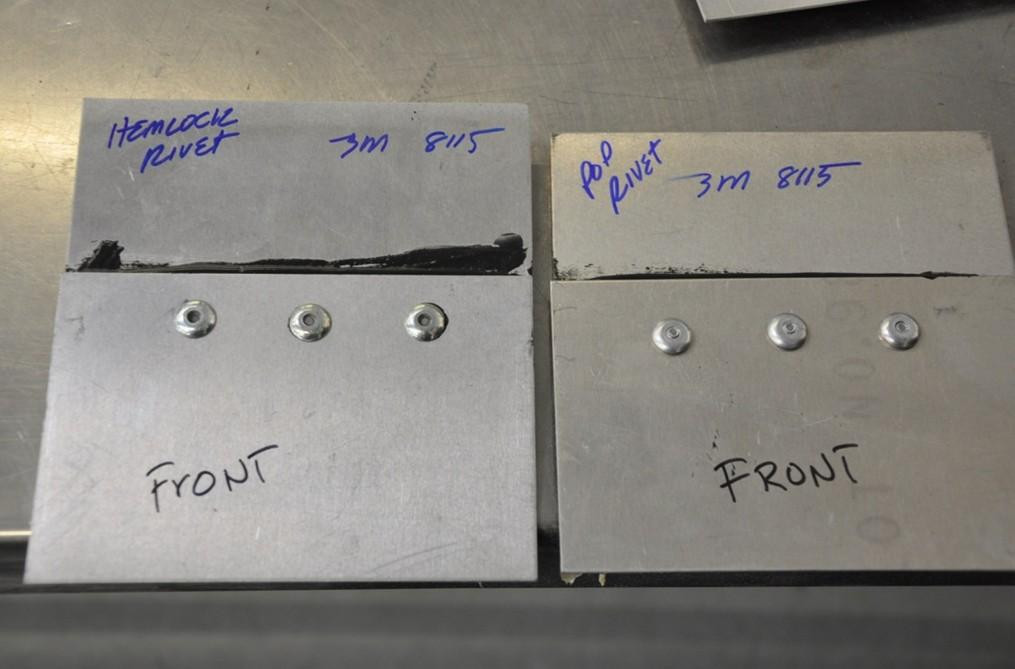 Hemlock and Pop rivets from the front.
Looking at the back side of the panel (below bottom) with Pop rivets installed, you don’t have to be a rocket scientist to see the difference. These pictures are self-explanatory.
 Hemlock, left, and Pop rivets, right, seen from the rear.
A Monobolt is a specific type of blind rivet. The mandrel is pulled into the cylinder and expands the cylinder against the backside of the panel. This rivet has high shear and tensile properties and fills the hole.
The other type of blind rivet used in the collision repair process is the Hemlock rivet. This rivet also needs a hole for installation and does not need access to the backside of the panel. The mandrel is pulled over the rivet body and the entire rivet is compressed against the rear panel.
This rivet has high shear and tensile properties and fills the hole. This rivet is excellent for holes that are slightly larger than the recommended hole size.
Necessary Tools and Best Practices
Installation equipment can be pneumatic or battery operated. I have both types: An Astro Pneumatic PR14 and Gesipa Taurus 4, which are both pneumatics, and a Gesipa Powerbird and Milwaukee M18 FUEL 1/4" Blind Riveter.
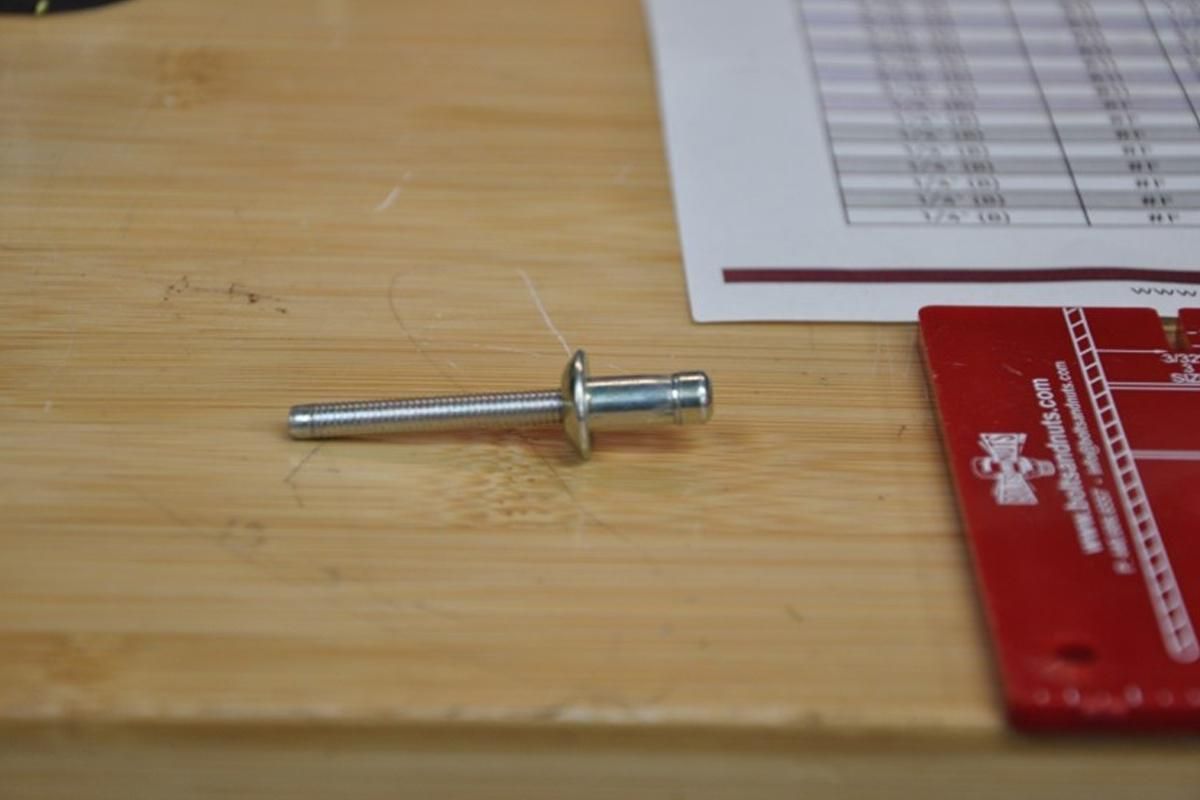
The picture at the top of the article is of a structural Ford blind rivet. Ford specifies in its repair manual the part number, but not the size for a specific location. So how would a technician determine the rivet with the proper grip range?
There is a blind rivet gauge from Bolts & Nuts along with a chart. Here is how it works:
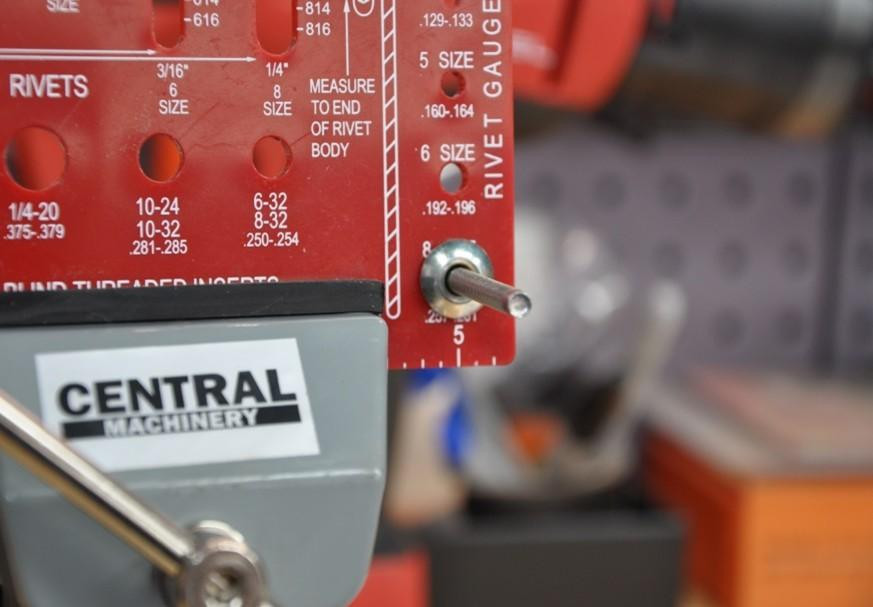 Determining the rivet size.
Take the rivet and find which size the rivet body fits in. This one is No. 8. Then, measure the rivet body length (do not include mandrel head) using the No. 8 slot. The size of the rivet is No. 82. Find No. 82 on the chart, and the measured rivet has a grip range from 1/16” to 1/8”.
Measure the total thickness of the panels that need the rivets. In this example, the total thickness is 1/8”. The selected rivet will work on this panel.
 Determining the grip range.
If the rivet is measured in metric, click here for a conversion chart.
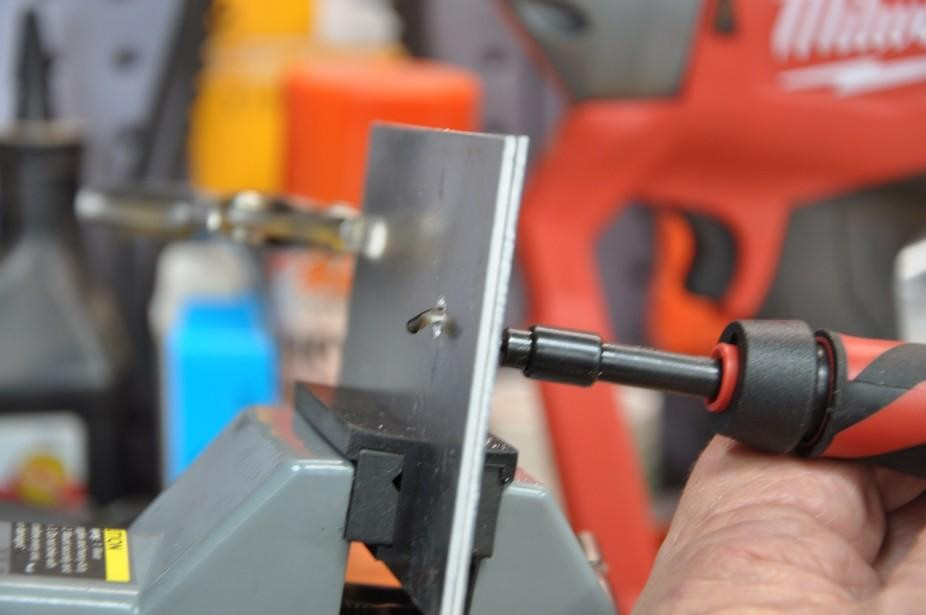
Next, prepare and install the selected rivet. The Ford procedures call for a 6.5-mm drill bit for blind rivets.
I perform I-CAR’s rivet bonding hands-on class -- a must for today’s techs -- and nearly every time, the shops do not have a 6.5-mm drill bit. The closest size is ¼”. The actual size of this rivet is 6.25 mm.
Before moving on, I want to mention these drill bits from Astro Pneumatic. The end of the bit is shaped like a pyramid. The bit does not wander and will step cut the hole two to three times faster than a standard drill bit. Use it on a low to medium speed, and it will not get as hot as a high-speed bit. I was at a local OEM training center and their tech was able to drill multiple holes into Martensitic steel (more than 1,300 mPAs), and the bit did not dull.
Now back to the drill process. Nearly every one of my techs takes the drill and enlarges the hole for the 6.5-mm rivet to fit.
You will notice on the ¼” hole, the rivet is not perpendicular to the surface, and there are large gaps around the rivet. Remember, glue has very poor shear strength, and if the rivet is loose in the hole, the panel will move sideways and cause the bond to break. Let’s return to the installation process after the correct size hole is drilled.
A 6.5-mm hole is drilled. Use locking pliers when drilling to make sure the joint is tight.
There is a piece of aluminum present after drilling. This needs to be removed prior to the rivet installation because the rivet will not sit flush to a panel. A deburring tool is used.
 A deburring tool.
If the tool has no access to the backside, there is a possibility an excess aluminum chip will not be removed. The Shaviv USA (B30 blade) cuts the front and backside at the same time.
The hole is deburred, the correct rivets are ready, adhesive is applied (if specified) and necessary clamps are assembled. The rivet tool for the Ford OEM blind rivet needs to have 3,500 pounds of pulling force.
When I teach I-CAR’s rivet bonding class, the shop supplies a blind rivet gun. Many are cheap units that will not pull the structural rivets, or they need multiple pulls for the rivet to set. I have purchased some of Astro’s air tools for my SEMA Show Kool Tools articles, and its Onyx 4-inch cut-off tool (#409) and heavy-duty air saw (#936) are two of the best I have used. I purchased Astro’s PR 14 to give it a try. It pulled the rivet for this article effortlessly. When I checked the specs, the pulling force was 2,800 pounds, below Ford’s blind rivet requirements.
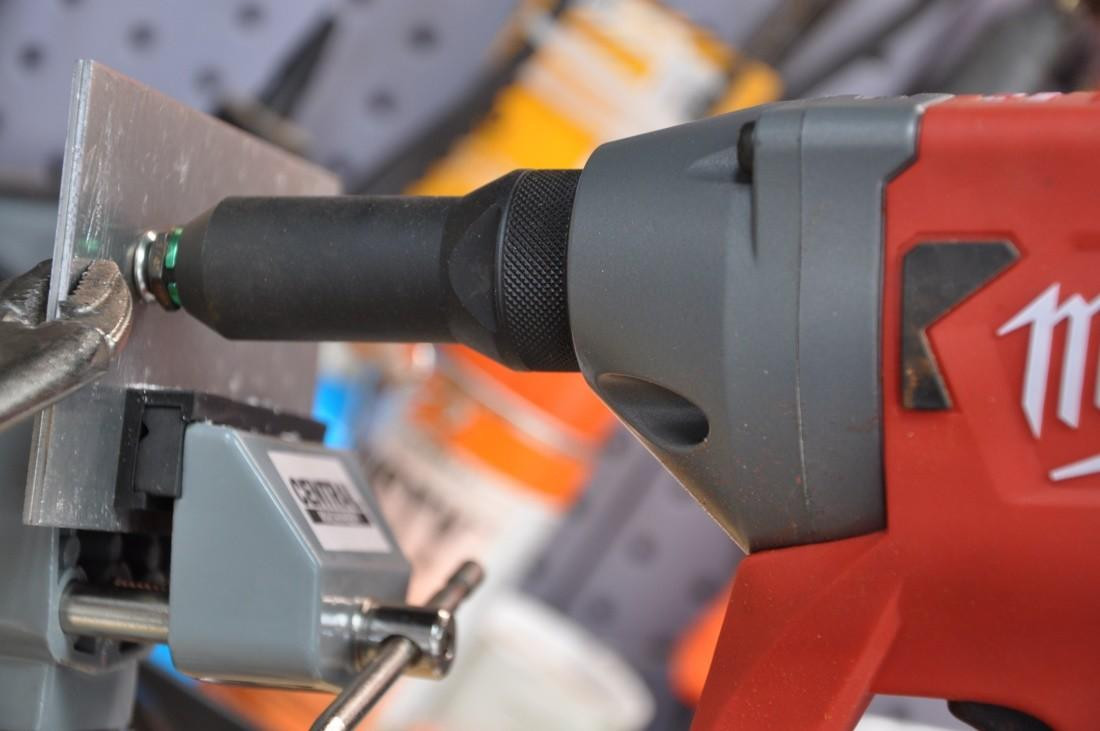 The final step.
My Taurus 4 has 5,500 pounds, Powerbird has 4,000 pounds and Milwaukee M18 has 4,500 pounds. To be on the safe side, purchase a blind rivet gun with a minimum pulling force of 4,000 pounds.
The nose of the rivet gun is pressed tightly against the rivet head and with a pull of the trigger, the rivet is set. That’s it.
The Milwaukee M18 fuel cell, with more than ample pulling force, has a nice kit with two batteries, charger and carrying case at a very affordable price.
Notes:
· Always refer to OEM rivet and adhesive usage before starting the repair process.
· Check the specs needed for your blind rivet gun to make sure it has the recommended pulling force.
· Use factory rivets.
· Follow the rules, and you and your technicians will have a great riveting experience.


